
Setup Hugo with GitLab CI on Ubuntu remote server
I have switched from WordPress to Hugo for many reasons and i am sure if you are reading this you may have your own. Setting up Hugo is not so difficult even if you don’t like to automate all this stuff, you can just use scp or rsync to push from your local machine to your server.
But at the end why not automate this job with more control. You can then write a post from anywhere in your GitLab repo and run the CI to publish that post at that very moment.
Friendly Note: This is going to be very long post, so bear with me. I will try to make it as simple and easy to follow as possible. And better to grab some tea or coffee.
I will divide it to three parts: Hugo setup, Server setup and GitLab repository and ci setup.
Tools
- Ubuntu 18.04 server
- Manjaro desktop (kde) [you can use any OS]
- GitLab
- Hugo
- Atom editor (choose your own weapon)
- Firefox
- Terminal (from time to time)
- File manager (dolphin here)
- Git
Part 1 - Hugo setup
I am on Manjaro Linux, so the command would be:
sudo pacman -S hugo
For Ubuntu it would be:
sudo apt install hugo
mian:~$ hugo version
Hugo Static Site Generator v0.51/extended linux/amd64 BuildDate: unknown
Lets create our 1st blog site. Open terminal and type cd /backups/Work/Hugo [your’s may be different than mine, so change it accordingly]. Run:
hugo new site myblog
You will see this if everything goes well.
Congratulations! Your new Hugo site is created in /backups/Work/Hugo/myblog.

Just a few more steps and you're ready to go:

1. Download a theme into the same-named folder.
   Choose a theme from https://themes.gohugo.io/, or
   create your own with the "hugo new theme <THEMENAME>" command.
2. Perhaps you want to add some content. You can add single files
   with "hugo new <SECTIONNAME>/<FILENAME>.<FORMAT>".
3. Start the built-in live server via "hugo server".

Visit https://gohugo.io/ for quickstart guide and full documentation.
Our myblog dir will have these:
mian:/backups/Work/Hugo/myblog$ ls
archetypes  config.toml  content  data  layouts  static  themes
Download and extract theme of your choice in themes dir from https://themes.gohugo.io.
I have downloaded https://github.com/calintat/minimal for a demo here. Rename it to minimal.
mian:/backups/Work/Hugo/myblog/themes$ ls
minimal
Copy the contents of exampleSite to myblog dir(overwrite). Make sure to change theme to your downloaded theme name(minimal) in config.toml.
1st 6 lines from config.toml, the rest you can change as you see fit.
baseURL = "/"
languageCode = "en-us"
title = "My Demo Blog"
theme = "minimal"
#disqusShortname = "username" # delete this to disable disqus comments
#googleAnalytics = ""
Time to generate and run our blog.
hugo
Successful blog information:
mian:/backups/Work/Hugo/myblog$ hugo

                   | EN
+------------------+----+
  Pages            | 49
  Paginator pages  |  2
  Non-page files   |  0
  Static files     |  1
  Processed images |  0
  Aliases          | 19
  Sitemaps         |  1
  Cleaned          |  0

Total in 20 ms
Let’s see how it look like in browser, run:
hugo server --watch -p 1414
If all goes according to plan, this is what we will see.
mian:/backups/Work/Hugo/myblog$ hugo server --watch -p 1414

                   | EN
+------------------+----+
  Pages            | 49
  Paginator pages  |  2
  Non-page files   |  0
  Static files     |  1
  Processed images |  0
  Aliases          | 19
  Sitemaps         |  1
  Cleaned          |  0

Total in 20 ms
Watching for changes in /backups/Work/Hugo/myblog/{content,data,layouts,static,themes}
Watching for config changes in /backups/Work/Hugo/myblog/config.toml
Serving pages from memory
Running in Fast Render Mode. For full rebuilds on change: hugo server --disableFastRender
Web Server is available at //localhost:1414/ (bind address 127.0.0.1)
Press Ctrl+C to stop
--watch flag is used to keep track of the changes we make in real time. -p is port number. Go to http//localhost:1414 and you will have this for a change. :)

We are pretty much done here. One last thing which is related to Git. We have to add .gitignore file to myblog(we can do this later also, but i prefer to do it now). Create .gitignore file and paste this inside it:
# Generated files at default location
/public/
/resources/_gen
I have used gitignore.io site to create it. You can add more to it for different applications. We definitely don’t want some dirs to go to our remote repo.
Part 2 - Server setup
I have used Linode $5 node with Ubuntu 18.04. You are free to choose any host you want. There are few things we will do on the server like use key-based authentication, disable password based logins, create new user, install apache etc.
Update your server, login to your server.
apt update && apt upgrade
Let’s create a new user.
adduser blogger
I have created blogger user, you can change that based on your needs. Now try to login with this user to your server.
Let’s create a key on our local machine. Name the key as server1 for example. Save this key in /backups/Work/Keys. Enter the path with the key name when asked like /backups/Work/Keys/server1.
ssh-keygen -t rsa -b 2048
Remember we do not want to upload the key as root user.
Now copy the public key to your remote server by(change the ip to your server ip):
ssh-copy-id -i server1.pub blogger@1.12.123.3
Change the permissions of private key:
chmod 400 server1
Now login to the server with the private key:
ssh -i server1 blogger@1.12.123.3
If you were able to login to your server, that means all good so far. Now let’s disable the password based logins on the server.
vim /etc/ssh/sshd_config
Change PasswordAuthentication yes to PasswordAuthentication no. It will be most likely line number 79 in sshd_config file. And run:
systemctl restart sshd
Check this post if you are interested to read more.
Next lets install and setup apache. I have already wrote a post about it few days ago. Follow the steps from there.
After apache setup we would like to change the owner of the web root to blogger from root.
chown -R blogger:blogger /var/www/html/domain1
Now create a .htaccess file in /var/www/html/domain1 and paste this in it.
RewriteEngine On

RewriteCond %{HTTPS} off [OR]
RewriteCond %{HTTP_HOST} ^www\. [NC]
RewriteCond %{HTTP_HOST} ^(?:www\.)?(.+)$ [NC]
RewriteRule ^ https://%1%{REQUEST_URI} [L,NE,R=301]

Options -Indexes

# Redirect 404,403 etc requests to error page
ErrorDocument 404 /404.html
ErrorDocument 403 /404.html
We are redirecting traffic to https and from www to non www. The last two lines are to load the 404 page in case someone entered wrong url.
These are the basic things which we needed to setup the server. We don’t want too many tools and applications to be installed on the server. Only apache is more than enough. You can also play around with the firewall(ufw) if you are into it.
The user name blogger, server ip, web root path and the private key will be used later at GitLab CI setup.
And with that we have concluded part 2.
Part 3 - GitLab repository and ci setup
Create a repository myblog for example [private(thats your choice)]. You can add your ssh key to use key based auth to GitLab or provide password for HTTPS everytime you want to do push/pull.
Quick commands to create and save the key in GitLab. Copy the key from cat command below and paste it in your GitLab Settings -> SSH Keys.
ssh-keygen -t rsa -b 2048
cat ~/.ssh/id_rsa.pub
Let’s init git in myblog dir. Change the REPO_LINK with the actual repository link.
cd /backups/Work/Hugo/myblog
git init
git remote add origin REPO_LINK
git pull origin master
git add .
git commit -m 'my 1st commit'
git push origin master
git checkout -b wip
Most of the commands i believe you already familiar with. The last command will create new branch wip and check it out. We will work on this branch. And it is also recommanded to work on different branches.
So at this point we have git initialzed and pushed our blog files to the repository.
Next let’s add ci variables. Go to repository settings -> CI/CD -> Variables. Add the following new variables. Change things accordingly to your requirements.
| Variable Key | Variable Value |
|---|---|
| DEPLOY_PATH | /var/www/html/domain1 |
| SERVER_IP | Server IP |
| SERVER_USER | blogger |
| SSH_PRIVATE_KEY | Paste your server Private Key |
To get your private key:
cat /backups/Work/Keys/server1
We are all set to create our ci yml file now.
cd /backups/Work/Hugo/myblog
vim .gitlab-ci.yml
And paste this inside.
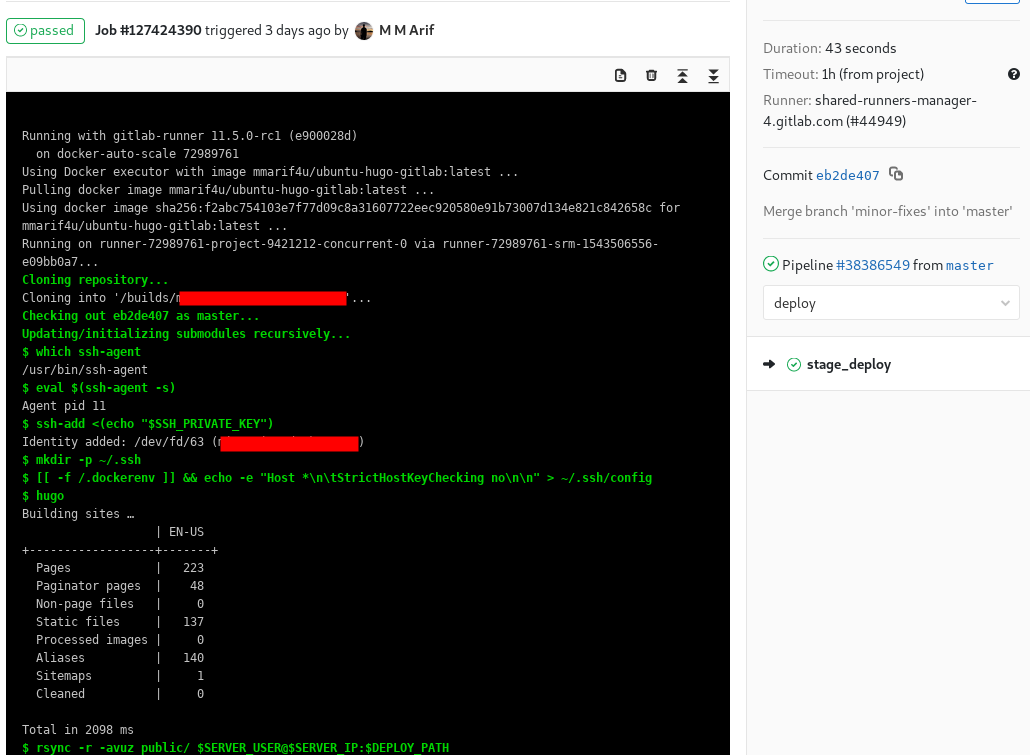
image: mmarif4u/ubuntu-hugo-gitlab:latest

stages:
  - deploy

before_script:
    - 'which ssh-agent'
    - eval $(ssh-agent -s)
    - ssh-add <(echo "$SSH_PRIVATE_KEY")
    - mkdir -p ~/.ssh
    - '[[ -f /.dockerenv ]] && echo -e "Host *\n\tStrictHostKeyChecking no\n\n" > ~/.ssh/config'

variables:
  GIT_SUBMODULE_STRATEGY: recursive

stage_deploy:
  stage: deploy
  script:
    - hugo
    - rsync -r -avuz public/ $SERVER_USER@$SERVER_IP:$DEPLOY_PATH
    - ssh -p22 $SERVER_USER@$SERVER_IP "find $DEPLOY_PATH -type d -exec chmod 755 {} +"
    - ssh -p22 $SERVER_USER@$SERVER_IP "find $DEPLOY_PATH -type f -exec chmod 644 {} +"
  only:
    - master
We are pulling mmarif4u/ubuntu-hugo-gitlab:latest, which i created specially for this. The image have everything ready like update the system, install rsync and openssh client etc. That will reduce our pipeline time. My pipeline time reduced from 1.30 minutes to around 50(avg) seconds(depends on the pull time). I am planning to use GitLab registery soon. You can use any other image, that’s your choice. Just make sure either the image have rsync and openssh client installed or install them on the runtime.
For runtime change this:
- 'which ssh-agent'
to
- 'which ssh-agent || ( apt-get update -y && apt-get install rsync openssh-client -y )'
At the deploy stage we are running hugo to build our site in public dir, then we use rsync to push the content of public dir to our server.
Next two lines are to change the permissions on the dirs and files within our deploy path.
We are almost done, let’s push this to the repository.
git add .
git commit -m "init ci stuff"
git push origin wip
Create a merge request to merge wip branch to master as our ci file has master branch for build set already.
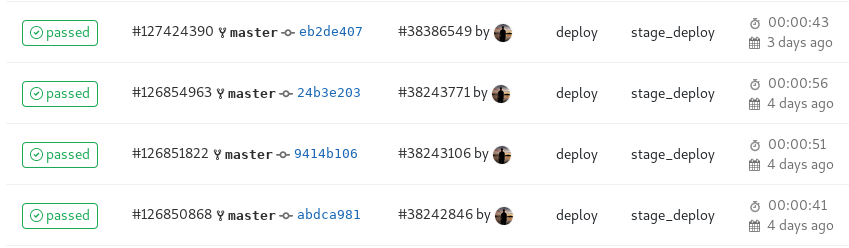
The ci will be triggered upon merge and pipeline will be kicked up. Check the status of it by clicking on it.
If you visit your domain now, chances are your will see the demo blog we created in part 1.
In the future you can do any changes you want to your blog like design changes, new posts etc. Create a new branch for it, push it to remote. Once you are sure everything is cool, merge it to master. And in no time your changes will be in your server.